The best way to secure your data using LUKS is to deploy a new OS.
I used Ubuntu Server 22.04 because 24.04 crashed when encrypting a LUKS partition step.
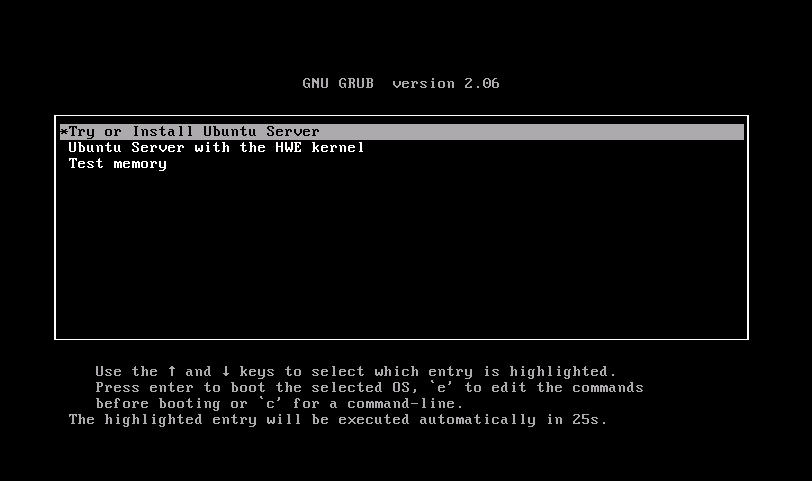
I will describe in full one of the installation options that I use. The first thing we will see is a window with a suggestion for installing the Ubuntu Server.
You can press Enter, and without waiting 30 seconds, the installation process will begin.
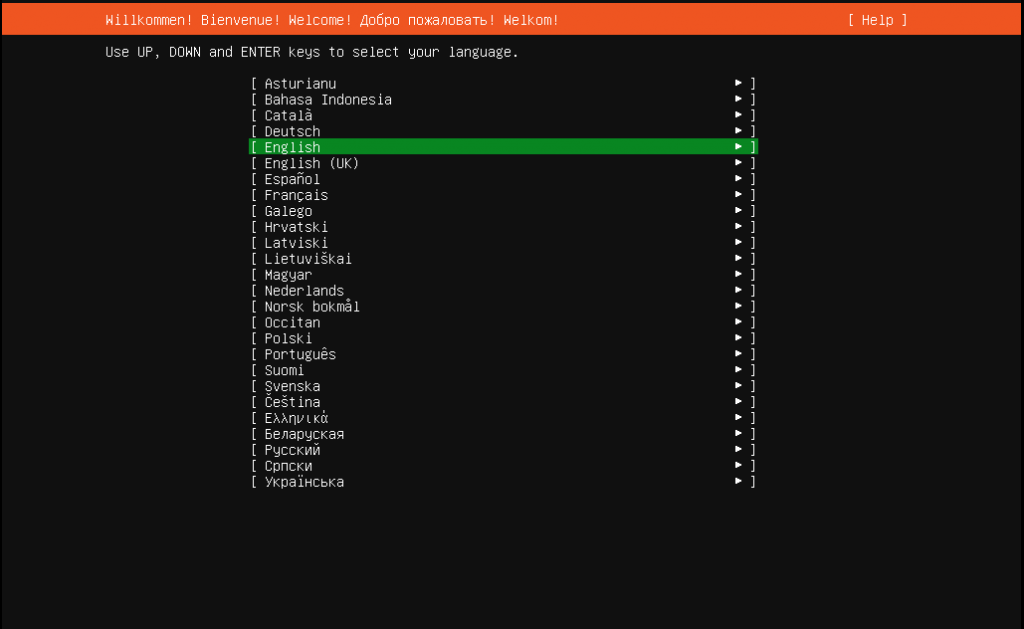
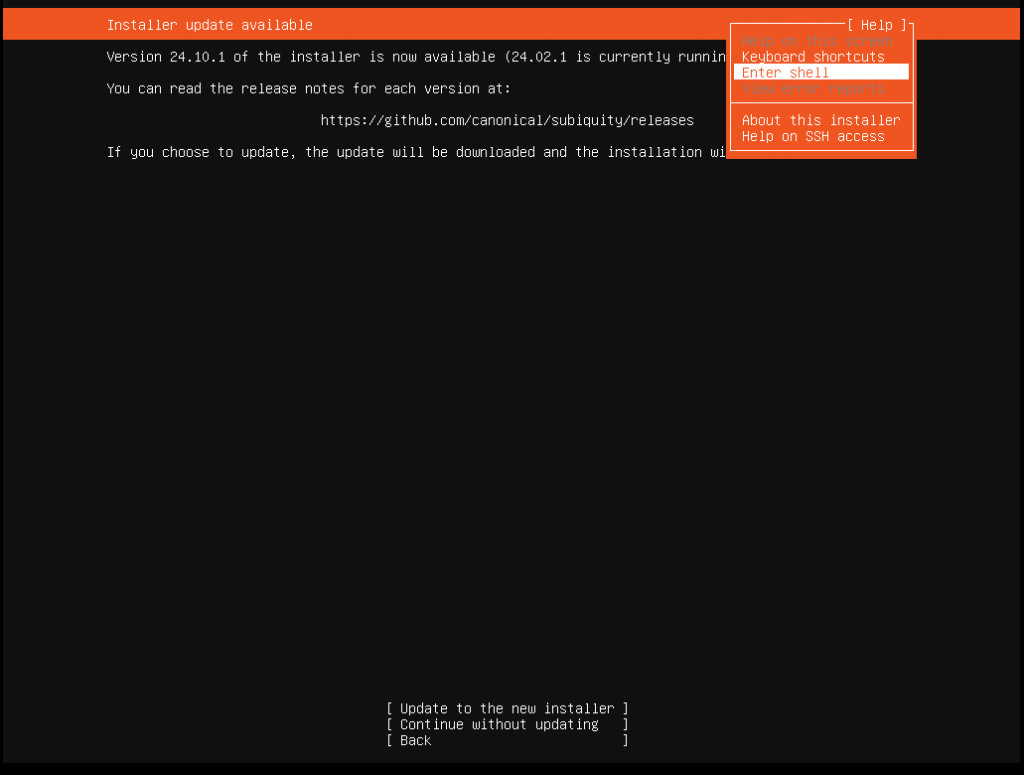
After that, you need to select a language. After selecting it, a window will open with a suggestion to continue without updating. I prefer immediately switching to an SSH connection and continuing the MobaXterm installation. Using the TAB key, select Help and select the Enter Shell option. Changing the password for the user called “installer”.
passwd installer
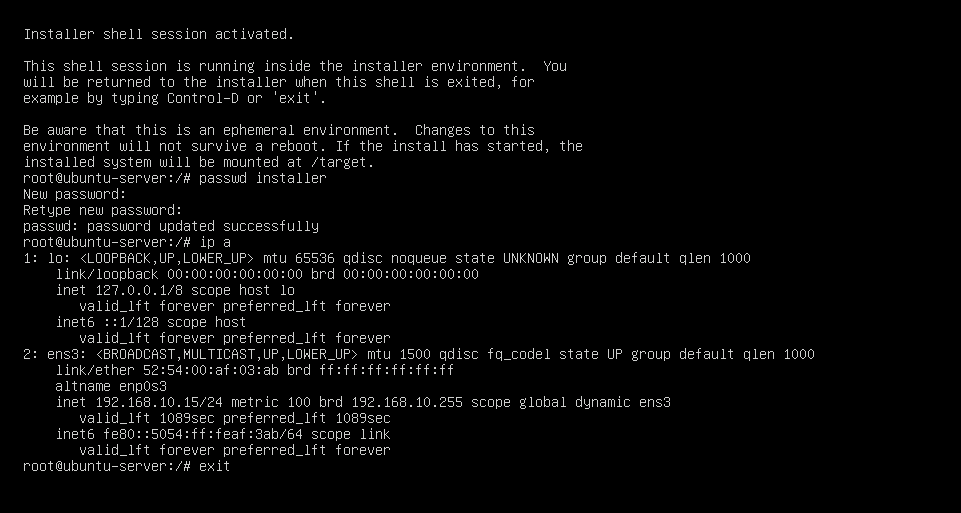
I enter the password twice, use the “ip a ” command to find out the current MAC and IP address, and if necessary, I make a MAC/IP bundle in DHCP and exit with the exit command.
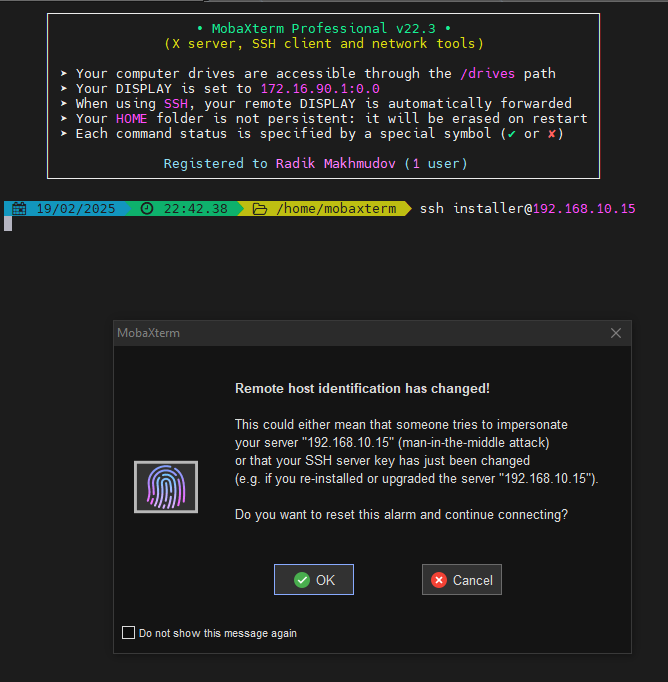
Launching an SSH session by using the command “ssh installer@192.168.10.15“, I confirm the connection. Now, the installation process is in my console.
We get to the disk configuration section, and it’s partitions and select the physical disk correctly. Select the LUKS option and enter the disk encryption password if there are several of them. During installation, choose a simple password like 123455678. When the system is ready, we will change the password to a good one.
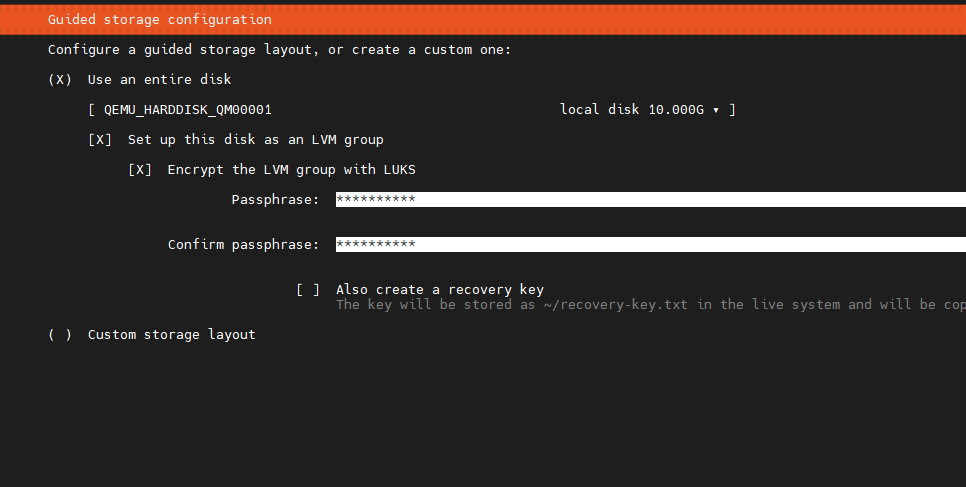
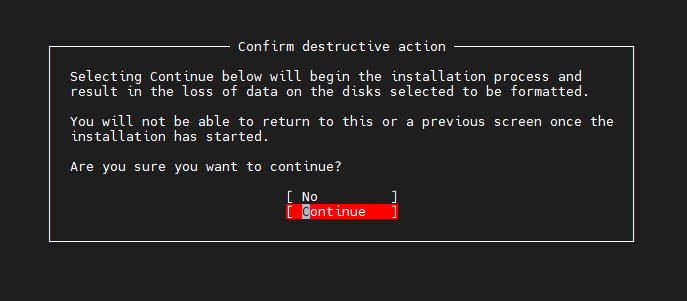
It will turn out something similar to this:
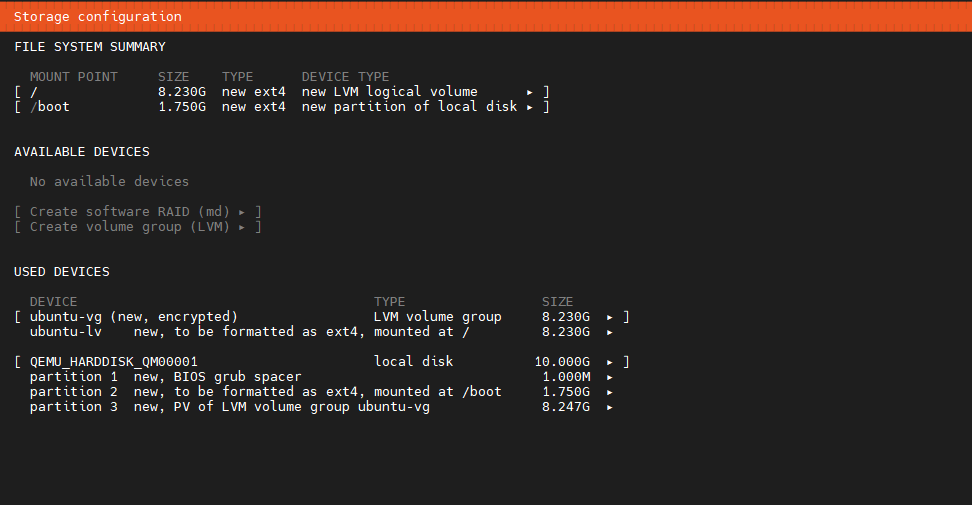
We confirm that we are sure
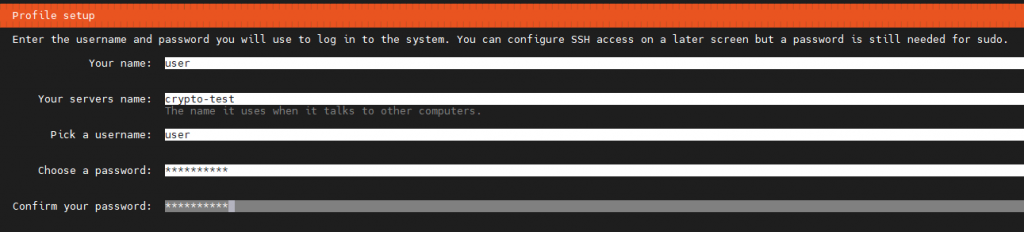
We enter the necessary data and continue
When installing Ubuntu Server with disk encryption using LUKS, the following algorithm is used by default:
Encryption algorithm: AES-XTS-plain64
Key size: 512 bits (for AES-XTS, the actual key is 256 bits for encryption and 256 bits for tweaking)
The hash function for the key: sha256
PDF (Password-Based Key Derivation Function): argon2id (starting with newer versions, pbkdf2 was previously used)
The number of iterations: dynamically determined during installation for optimal balance between performance and security.
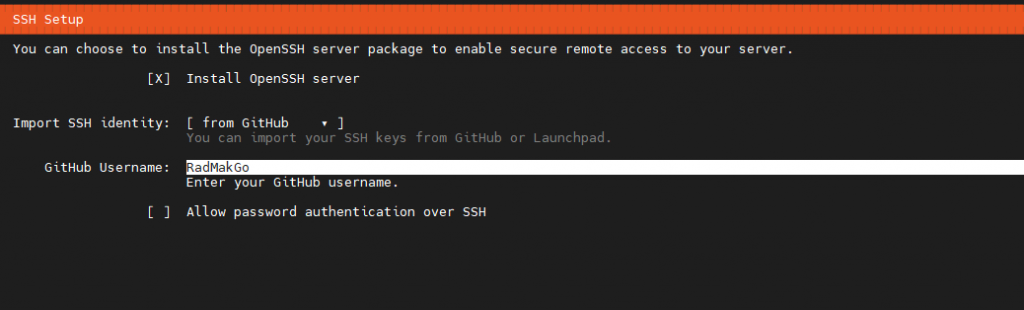
We indicate that we want to install an SSH server and take the public key from GitHub or Launchpad, if available; if not, leave “none.” In my case, I have a public key on GitHub, and I immediately refuse to use SSH password access.
If the public key is found, it must be checked and confirmed. Next, we watch the system installation process; after finishing, select the Reboot Now option, after which the session will end.
The installation process will stop and prompt you to enter a password to decrypt the disk, and the installation process will continue. After that, we reconnect via SSH and are back on the server.
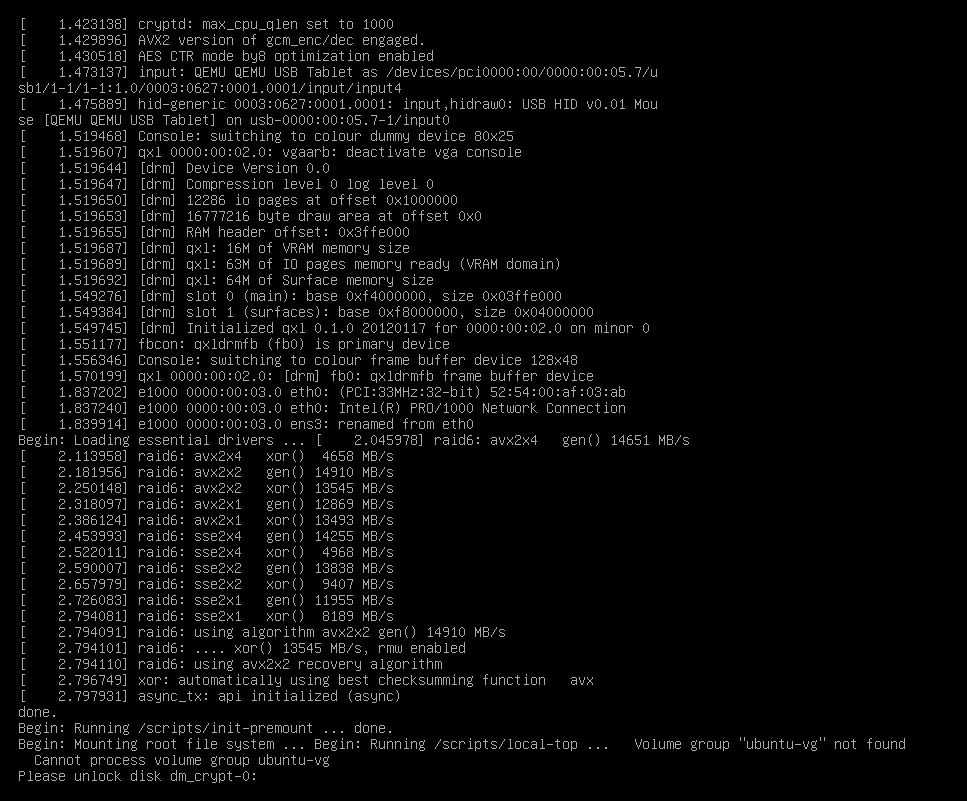
The decryption password is entered before the system boots, so you must go to it and type it on the keyboard or do it remotely through the virtual machine manager or BMC, if available. Another solution would be to use a simple SSH server that starts at the time of initramfs initialization, with which you can enter the LUKS password remotely and decrypt the disk so that the system can boot.
sudo apt update && sudo apt install upgrade -y
sudo apt install dropbear-initramfs -y
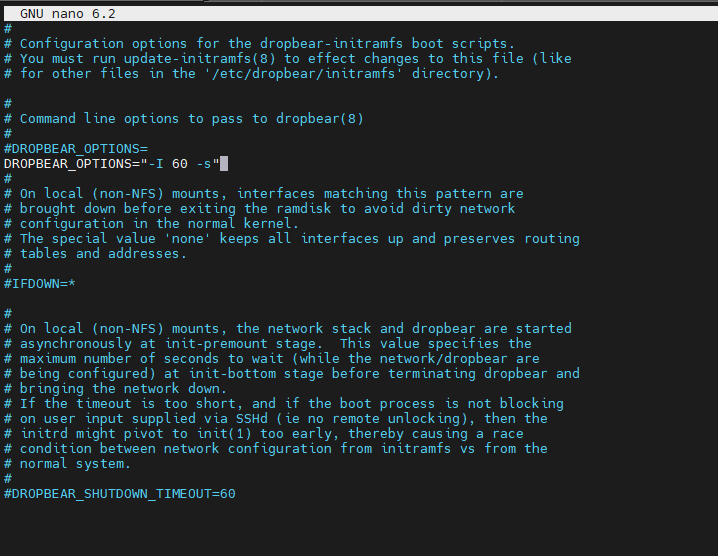
Making changes to the configuration file /etc/dropbear/initramfs/dropbear.conf and adding the option DROPBEAR_OPTIONS=”-I 60 -s”
-I 60 tells dropbear to terminate any connection that is idle for 60 seconds
-s – disables password logins.
For more options, see man dropbear 8
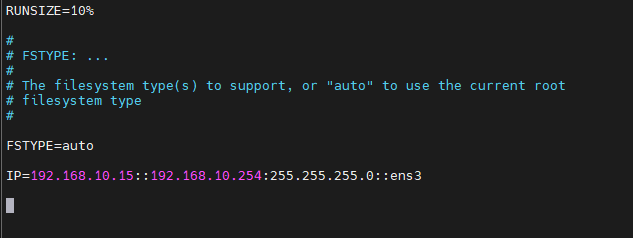
To assign a static IP address, you need to register it in the /etc/initramfs–tools/initramfs.conf file.
IP=<local–ip>::<gateway–ip>:<subnet–mask>
or
IP=<local–ip>::<gateway–ip>:<subnet–mask>::<interface> , if there are several interfaces.
Now you need to enter your public key into the file /etc/dropbear/initramfs/authorized_keys , if not, generate it first. After making the changes, you need to update the loader.
sudo update-initramfs -u
After restarting the server
sudo reboot now
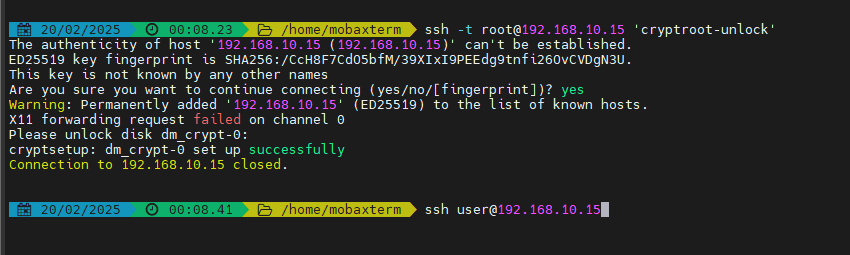
We perform an ssh connection for the root, and immediately send the cryptroot–unlock command to the terminal. It is necessary to use the –i option to specify the path and name of the public key; I have it pulled up automatically.
ssh -t root@192.168.10.15 'cryptroot-unlock'
Enter the password–>Enter. If ok, then an SSH session will close automatically.

The system will boot up, and then we connect with the key by username.
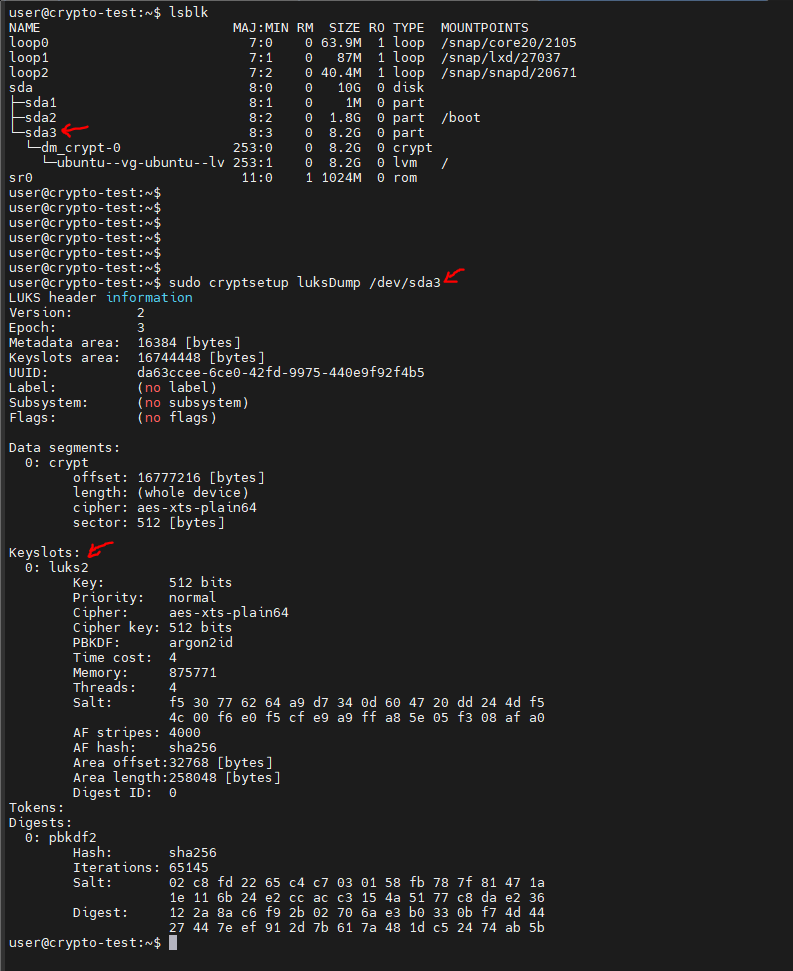
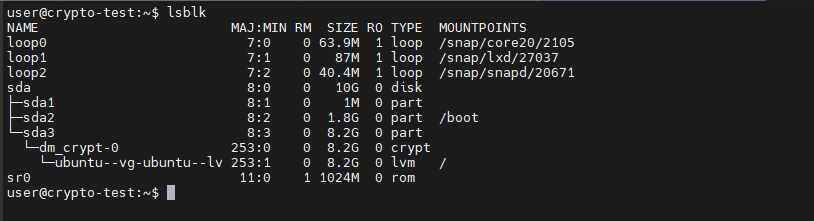
Looking at the disk partitions and checking the parameters of the existing LUKS volume.
/dev/sda3 is a device with a LUKS partition
The occupied and free slots will be displayed in the Key Slots section.
lsblk
sudo cryptsetup luksDump /dev/sda3
It’s time to change the encryption key; for convenience, I specified the key 12345678 during installation.
I generate the actual 256-bit (32-byte) key with the command:
openssl rand -hex 32

It will issue a key type: 4f9de22c93de069cd483fc674df7f17d8453df23b8687e2305ff7dc16e7e3600
or
like this, where there are various symbols
openssl rand -base64 32
It will issue a key like: T9rMPN52sU322UcWmcZcWdPouJWpFw1tpAhA6/KKfmY=
If copying the contents from the terminal to the clipboard causes problems, the key can be saved to a file by adding >/root/luks-disk.key at the end and immediately protecting the key file with the command:
sudo chmod 400 /root/luks-disk.key
Important:
When transferring keys with different characters, it is better to use files to avoid problems with interpretation. I immediately write it down in KeePass so it doesn‘t get lost.
Adding a new key
If the clipboard in the terminal is working fine, then use the command:
sudo cryptsetup luksAddKey /dev/sda3
If not, you can read it from the key file.
sudo cryptsetup luksAddKey /dev/sda3 </root/luks-disk.key
The system will ask you to enter the encryption key; enter the one you installed, 12345678, and the new key twice.
Checking
sudo cryptsetup luksDump /dev/sda3
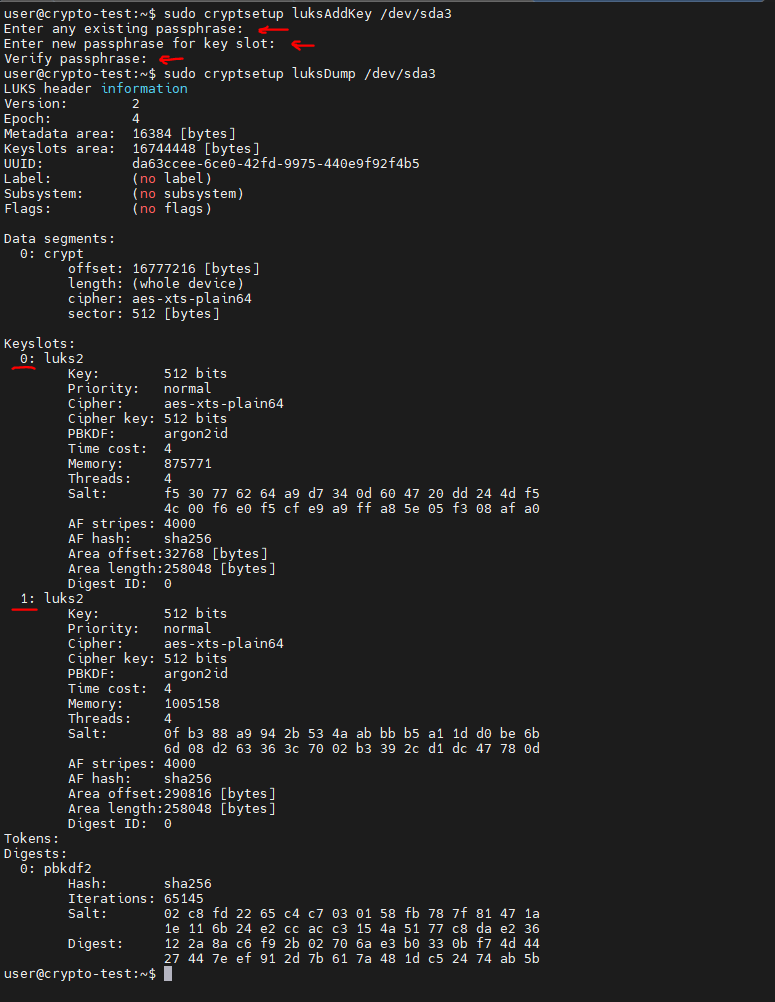
Two key slots are already occupied, so it’s okay.
Deleting the old, simple encryption key
sudo cryptsetup luksRemoveKey /dev/sda3
and enter the key that needs to be deleted, in our case 12345678.
Checking it out again
sudo cryptsetup luksDump /dev/sda3
Only one slot is occupied, which means that the deletion was successful.
You can check the operation with the command:
sudo cryptsetup open /dev/sda3 my_secure_volume, then enter the password
or
sudo cryptsetup open /dev/sda3 my_secure_volume --key-file /root/luks-disk.key
The system will give an error that the disk has already been mounted, it’s not a big deal, the new key has been checked.
If the key file is no longer needed, delete it with the command:
shred -u /root/luks-disk.key
Important:
Backup access: Always leave one secure key or password in case of failure. Security: When using key files, ensure they are stored in a safe directory. PBKDF settings: LUKS2 uses argon2id by default in new versions of Ubuntu but can be reconfigured. That‘s it. The system is ready.
What should I do to increase the size of the QEMU–KVM virtual disk?
1. Check the current status of partitions by using the command
lsblk
lsblk-e7
2. Turn off the virtual machine and run the command in the hypervisor host
qemu-img resize /path/to/vm-disk.qcow2 +10G
This will add 10 GB to the VM’s hard disk file.

3. Launch the virtual machine
4. Connect via SSH and decrypt the disk
5. We connect via SSH to the system
6. We check the disk capacity. In the example, the sda disk became 20G
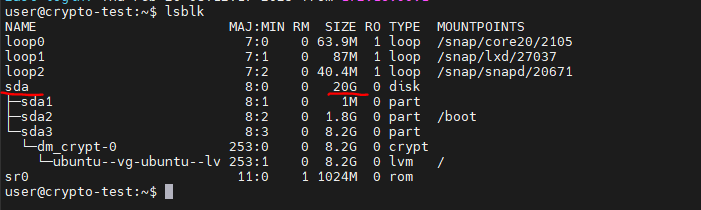
7. Run the program to work with disk partitions with the command
sudo parted /dev/sda
8. We enter the print command and say fix the problem; we answer Fix. We see what has become 20G.

9. We need to increase the size of the sda3 partition (in our case, it goes under number 3), on which the encrypted disk partition is based, giving it all the free space, i.e. 10G, for this, we write the command:
resize part 3 100%
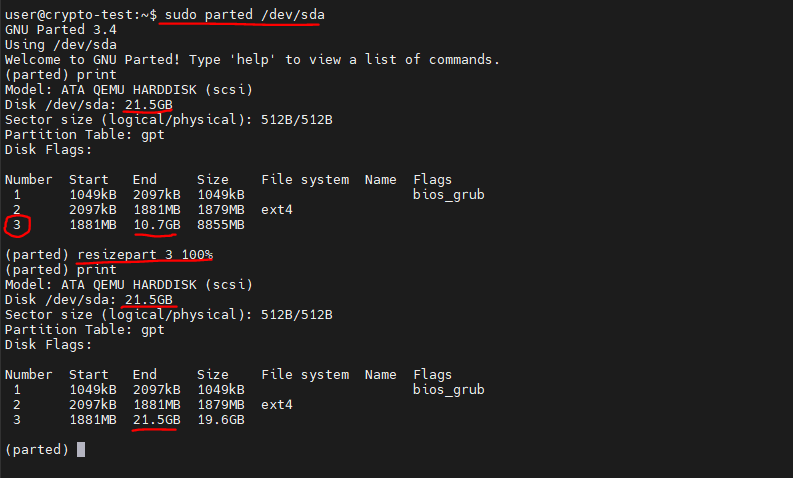
10. Exit the program:
quit
11. Update the partition table:
sudo partprobe
12. Expand the LUKS section –> enter the disk encryption key.
sudo cryptsetup resize dm_crypt-0
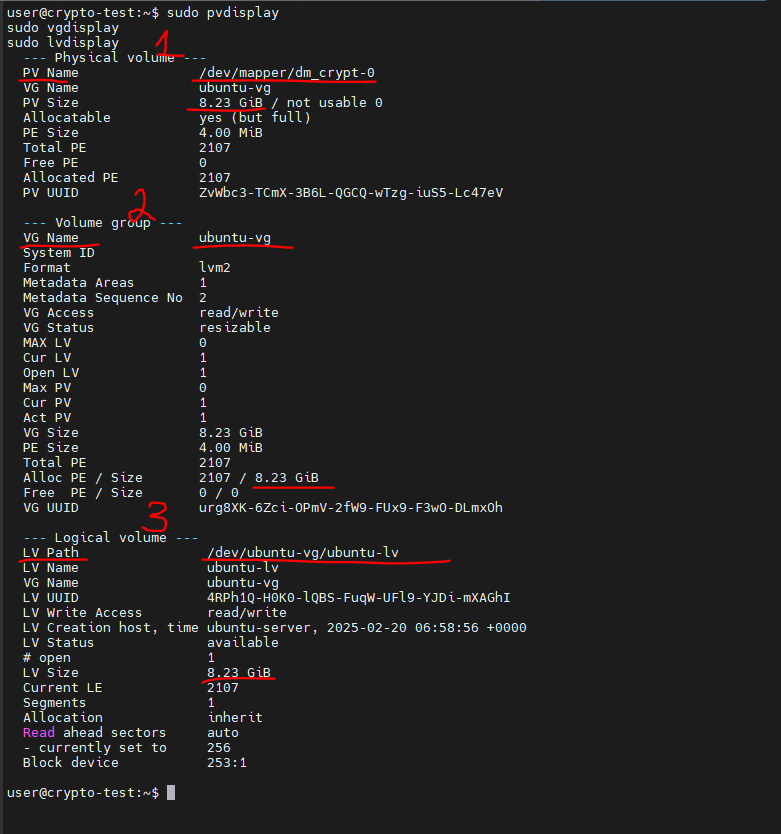
13. Expanding LVM, first we look at the current state, use commands:
sudo pvdisplay
sudo vgdisplay
sudo lvdisplay
14. Expand PV:
sudo pvresize /dev/mapper/dm_crypt-0
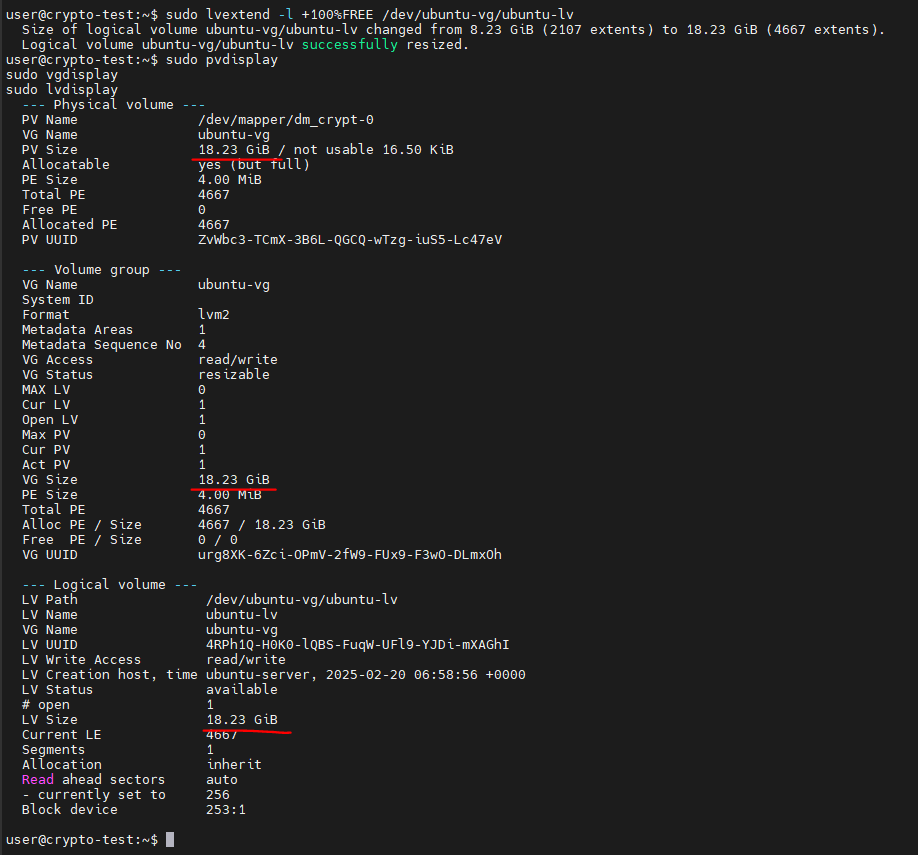
15. Expand VL:
sudo lvextend -l +100%FREE /dev/ubuntu-vg/ubuntu-lv
16. Checking:
sudo pvdisplay
sudo vgdisplay
sudo lvdisplay
17. Expanding the file system, I have ext4:
sudo resize2fs /dev/ubuntu-vg/ubuntu-lv
18. Checking:
lsblk -e7 && df -h
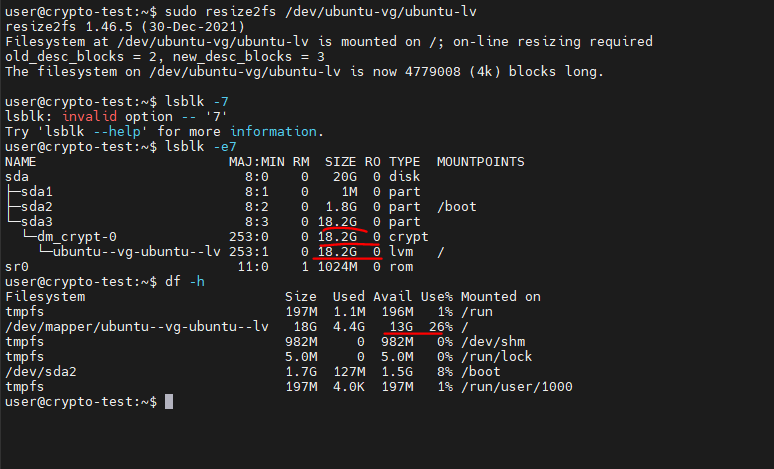
Done!
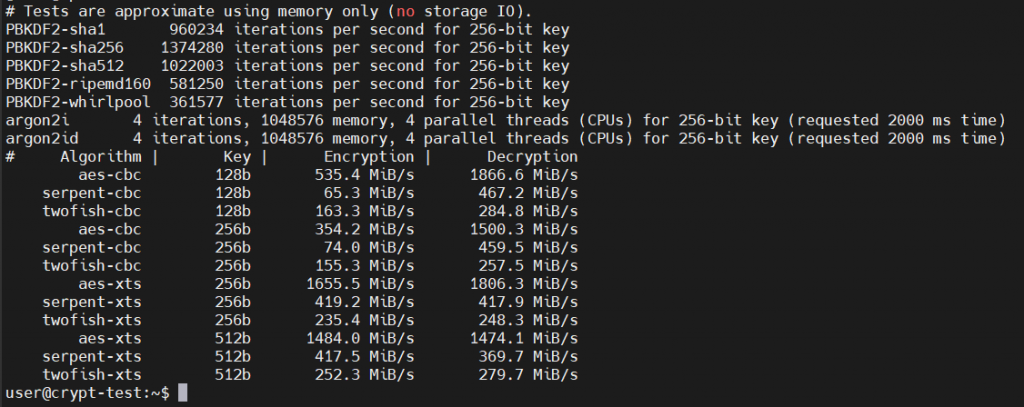
If you’re interested in benchmarking (performance test) LUKS/cryptsetup, use the command:
sudo cryptsetup benchmark